
8

 |
 |
8 |
 |


|
The LA Fox Developer Newsletter
March 1998
Subclassing the Visual
FoxPro Base Classes
by Russell Campbell
This article is designed to be ushort and to the point.Ē It tells
you how to subclass the Visual FoxPro bases classes, but not
why you want to do that. There are plenty of explanations in
books and the trade rags as to why you should subclass the
VFP base classes. Trust me
-
you donít want to work directly
with the VFP bases classes. Always work with your
subclassed version of the VFP base classes and youíll be a
productive, happy programmer with a good bit more hair. That
having been said, letís get straight to the point of this article.
Open a new, non-wizard form by clicking the File menu and
selecting New (FiIe:New). Choose Form as the file type and
click New File. Ensure that the Form Controls toolbar is visible.
The standard toolbar is shown in figure 1.
If you have a form open and you donít see this toolbar, click
View:Toolbars, check Form Controls and click OK. Now that
we
can
When you pick controls from the standard Forms Control
toolbar, youíre using VFPís base classes. That is exactly what
you donít want to do! So how do we get controls on forms
without using this standard toolbar? Well, youíve got to create
your own toolbar with your own controls. Thatís really not hard
and weíll do it right now.
To get started, click FiIe:New, select Class as the file type, then
click New File. This will bring up the dialog box pictured in
figure 2.
From this dialog box you are about to create a class that is
stored in a class library. Weíll create these classes in a
specific order so that they appear on your toolbar in the same
order as they do on the standard toolbar. Name the class
something meaningful to you. I just use the base class name
with an 'i" at the beginning. The Based On combobox should
say Separator. The Store In field is where youíll put the name of
the visual class library in which this class will be stored.
Please note that you can click on the button to the right of this
field to navigate to a particular drive and folder and even create
new folders as you go thanks to the Win95 interface. Put the
path and file name in this field and make sure you put it into a
ďcommonĒ directory for development purposes, not a directory
that contains a particular project. When youíre done, click OK.
When youíve clicked OK, the Class Designer will appear with
what looks like a teeny, tiny form in it. Leave it be. You have
created a single class (a subclass of the FoxPro separator base
class) in a Visual class library. Not real hard was it? Later,
youíll add this library as a toolbar into the VFP environment.
Now all you have to do is add a subclass for each of the VFP
base classes to this same visual class library. Thatís not hard
ó
itís almost the same as adding the first one, but you just
repeat it for each VFP base class.
To do this, simply close the Class Designer. Then click
Tools:Class Browser, navigate to the directory where you
created your visual class library, and double-click on it to open it
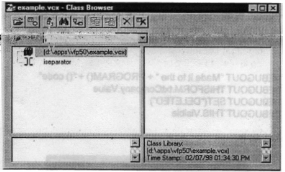
in the Class Browser. The Class Browser should look some-
thing like figure 3. Note that it has your separator class in it.
From the Class Browser, you will add additional classes based
on the VFP base classes until you have your visual class library
filled up with subclasses of each of those base classes (actu-
ally in this article weíre only dealing with control classes that
can be placed on a form). Then youíll be able to add it as a
toolbar to the FoxPro environment and pick controls from itto
be placed on a form. At that point, all your controls will be
based on subclasses of the base classes and not the base
classes themselves. This is the goal we are shooting for. The
next section explains about how to go about these final steps.
Your class library now has one class in it
ó
your subclassed
version of the separator base class. Completing the task of
subclassing all the base classes is just a matter of adding a
(Conít, page 4)
Figure 1
Figure 3
Figure 2
Page 8
|
 |
 |
8 |
 |